Land clearing services play a critical role in preparing properties for construction, agriculture, landscaping, and other land development projects. The process involves removing trees, brush, stumps, rocks, and other obstacles to create a safe and usable space. Whether for residential, commercial, or agricultural purposes, professional land clearing ensures that the land is ready for its intended use while minimizing environmental impact and adhering to safety standards. Understanding the scope, techniques, and benefits of land clearing services allows property owners and developers to maximize the potential of their land efficiently and responsibly. Visit Website to learn more.
At its core, land clearing is the first step in transforming undeveloped land into a functional and productive property. It provides a clean slate for construction projects such as building homes, commercial facilities, or infrastructure developments. Without proper clearing, hidden obstacles like stumps, boulders, and dense brush can create hazards, slow progress, and increase costs during construction. Professional land clearing services use specialized equipment and techniques to ensure that the work is completed quickly, safely, and thoroughly, eliminating potential delays and complications later in the project.
One of the most significant benefits of land clearing is safety. Unmanaged land can harbor overgrown vegetation, fallen trees, and debris that pose risks to workers and equipment. In addition, tall grass and dense underbrush can increase the likelihood of fire hazards, particularly in dry areas. Professional land clearing not only removes obstacles but also reduces the risk of accidents, allowing for safer construction and development. Safety protocols followed by trained crews further ensure that the clearing process does not result in injury or property damage.
Land clearing services are also essential for improving the accessibility and usability of land. Overgrown lots or fields can make it difficult for vehicles, machinery, and personnel to navigate the area. By removing trees, brush, and stumps, cleared land becomes more accessible for heavy equipment, construction vehicles, and workers. This improved access allows for smoother project execution, whether it involves building roads, laying foundations, or preparing the land for agricultural use. In addition, cleared land can be graded and leveled to prevent water pooling and promote proper drainage, further enhancing its usability.
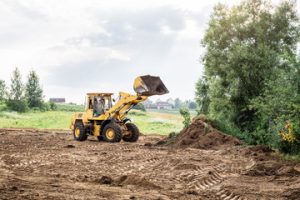
Professional land clearing typically involves a combination of mechanical and manual techniques. Heavy machinery, such as bulldozers, excavators, and skid steers, is often used to remove large trees, rocks, and dense brush efficiently. For smaller or more sensitive areas, crews may rely on hand tools and chainsaws to carefully clear vegetation without damaging the surrounding environment. Stump removal is another critical aspect of land clearing, as remaining stumps can interfere with construction, landscaping, or farming operations. Grinding or extracting stumps ensures a clean, smooth surface ready for further development.
To help property owners understand the full scope of land clearing services, here is an enumerated overview of common types of land clearing work:
1. Common Land Clearing Services
- Tree and Brush Removal – Eliminating unwanted trees, shrubs, and overgrown vegetation to create clear, usable land.
- Stump Grinding and Removal – Removing tree stumps to prevent obstacles and prepare the land for construction or landscaping.
- Rock and Debris Removal – Clearing large rocks, boulders, and miscellaneous debris for safety and accessibility.
- Grading and Leveling – Creating a smooth, even surface suitable for construction, drainage, or farming.
- Land Preparation for Agriculture – Removing obstacles and preparing soil for planting crops or pasture development.
- Right-of-Way Clearing – Clearing paths for roads, utilities, pipelines, or access routes.
- Forestry and Timber Management – Controlled removal of timber while managing environmental sustainability.
- Brush Mulching – Reducing vegetation into mulch for soil enrichment and erosion control.
Environmental considerations are increasingly important in land clearing projects. Removing trees and vegetation can affect soil quality, local ecosystems, and water drainage patterns. Professional land clearing services incorporate techniques that minimize environmental impact, such as selective clearing, mulching, and preserving valuable trees or vegetation when possible. Proper planning and execution help maintain soil stability, prevent erosion, and reduce negative effects on nearby waterways. By balancing land development needs with environmental responsibility, these services ensure sustainable outcomes for long-term land use.
Land clearing also supports efficient construction and infrastructure development. Projects that begin on cleared land progress faster because contractors can work without obstacles or delays. For example, cleared and graded sites allow construction crews to position foundations, erect structures, and install utilities without interference from trees, rocks, or uneven terrain. This efficiency not only saves time but also reduces labor costs and equipment wear, making professional land clearing a smart investment for any development project.
Safety remains a top priority throughout the land clearing process. Overgrown lots, fallen trees, and hidden obstacles can pose serious risks to both personnel and equipment. Trained land clearing crews implement strict safety protocols, using protective equipment, machinery safeguards, and careful planning to prevent accidents. Proper training ensures that heavy machinery is operated correctly, trees are felled safely, and debris is handled appropriately. By prioritizing safety, land clearing services help property owners avoid costly accidents and maintain regulatory compliance during development.
Another advantage of professional land clearing is its impact on property aesthetics and usability. Cleared land creates an open and inviting space, enhancing the visual appeal of the property. For residential projects, this can include lawns, gardens, or landscaped areas. In commercial settings, cleared land may provide space for parking lots, building pads, or recreational areas. In agriculture, cleared fields allow for efficient planting, irrigation, and harvesting. By transforming overgrown or unused land into organized, functional areas, land clearing services add value and practicality to any property.
Maintenance is another aspect of land clearing that supports long-term land management. After the initial clearing, periodic upkeep may be necessary to prevent regrowth of brush, weeds, or invasive plants. Professional services can implement ongoing maintenance plans that include mowing, mulching, and trimming to preserve clear and safe land. Regular attention prevents the area from becoming overgrown again and ensures that the land remains suitable for construction, landscaping, or agricultural use.
Land clearing projects vary significantly in scale and complexity. Large tracts of land require heavy machinery, extensive planning, and a team of skilled operators, while smaller residential lots may require targeted clearing using hand tools and smaller equipment. Regardless of size, professional land clearing services assess the site, identify potential obstacles, and develop a tailored plan to address the unique needs of each project. This level of planning ensures efficient execution, cost-effectiveness, and high-quality results.
For property owners considering land clearing, it is essential to recognize situations where professional assistance is necessary. Here is another enumerated list highlighting when land clearing services are recommended:
2. When to Hire Professional Land Clearing Services
- Overgrown or Undeveloped Lots – Properties with dense vegetation, trees, or brush that need to be cleared for construction or landscaping.
- Tree and Stump Removal – When large trees or stumps pose hazards or interfere with development plans.
- Rocky or Debris-Filled Land – Sites with boulders, rocks, or construction debris that need removal for safety and accessibility.
- Agricultural Preparation – Fields that require clearing and grading before planting crops or establishing pastures.
- Construction Site Preparation – Land that must be cleared and leveled for buildings, roadways, or infrastructure projects.
- Right-of-Way or Utility Access – Paths that need clearing for pipelines, roads, or utility lines.
- Erosion or Drainage Issues – Overgrown land that contributes to poor drainage or soil erosion, requiring proper management.
- Land Rehabilitation Projects – Restoring neglected or abandoned properties for productive use.
Cost-effectiveness is another benefit of professional land clearing. While some property owners may attempt to clear land themselves, the process is labor-intensive, time-consuming, and potentially dangerous. Professional crews bring specialized equipment, experience, and efficiency to the project, often completing tasks faster and more safely than an untrained individual could. By hiring experts, property owners can avoid equipment damage, personal injury, and costly mistakes, ultimately saving money in both the short and long term.
Environmental compliance is also an important consideration in land clearing. Regulations may dictate how vegetation can be removed, how debris is disposed of, and how erosion is controlled. Professional land clearing services are familiar with local and regional regulations and ensure that clearing activities are conducted legally and responsibly. This reduces the risk of fines, penalties, or project delays caused by non-compliance.
In addition to removing obstacles, land clearing often includes grading and leveling. Proper grading ensures that water drains away from structures, preventing flooding or water damage. Leveling also provides a stable foundation for construction projects, roads, or agricultural operations. These preparatory steps are essential for long-term stability and usability of the land, making professional land clearing a critical first step for any development project.
In conclusion, land clearing services provide property owners, developers, and agricultural operators with the tools and expertise needed to transform raw land into functional, safe, and productive spaces. From tree and brush removal to stump grinding, grading, and debris management, these services ensure that the land is ready for its intended use while minimizing environmental impact and maximizing efficiency. By hiring professional land clearing services, property owners can save time, reduce risks, and achieve high-quality results that enhance both usability and value. Properly cleared land lays the foundation for successful construction, landscaping, or agricultural projects, making it an essential investment in the future of any property.